
Background
Updated on 05/10/2021 to include additional link from Apple on this new requirement.
Background
Back in early February of this year, we received the email below from Apple concerning our Apple Business Manager (ABM) account.

- In March 2020, Apple made it a requirement for organizations to verify a new domain before using it with Managed Apple IDs. Verification has been optional for domains in use before this date.
- Starting May 26, 2021, Apple will require organizations to verify all existing and new domains associated with Apple Business Manager.
- Your domain @domain.com has not been verified. If you do not verify this domain, you will no longer be able to create new Managed Apple IDs using this domain after May 26, 2021.
We have been using Apple Business Manager for quite some time since migrating from DEP and VPP, and we want to handle this promptly well before Apple’s deadline.
More information can be found via this link: Verify domains in Apple Business Manager and Apple School Manager
Steps
To continue to use and create new Managed Apple IDs on your domain, here are the steps to verify it using these instructions.
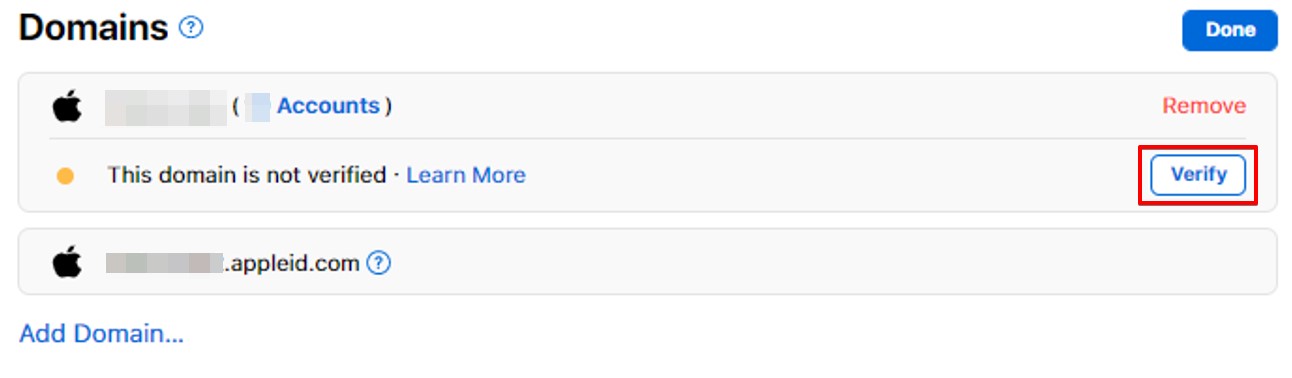
- In Apple Business Manager , sign in with an account that has the role of Administrator or People Manager.
- Click Settings at the bottom of the sidebar, then click Accounts below Organization Settings.
- Review the list of domains, then click Edit > Verify next to the domain you want to verify.

- You will see a TXT record and receive an email saying that the domain you selected is now attempting to be verified. You have 14 calendar days to complete the verification process. The TXT record contains a string with random characters at the end, for example, apple-domain-verification=RaNdOmLeTtErSaNdNuMbErS.
- Click Copy and save it.

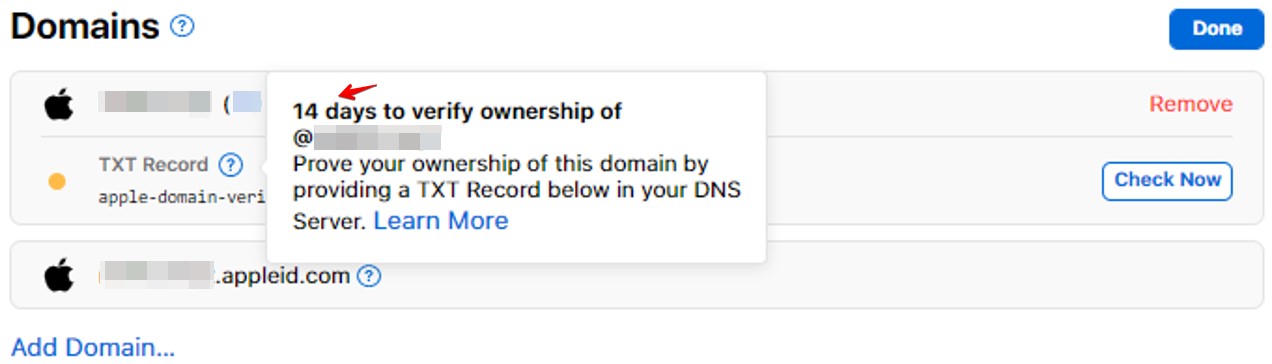

- Add the TXT record to your DNS zone file from step 5.
- To verify the TXT record is added, from a MacOS machine launch Terminal under Finder > Applications > Utilities and type in dig txt yourdomain.com (replace yourdomain.com with your actual domain). You should see the TXT record there similar to the screenshot shown below.
 (credit: Apple)
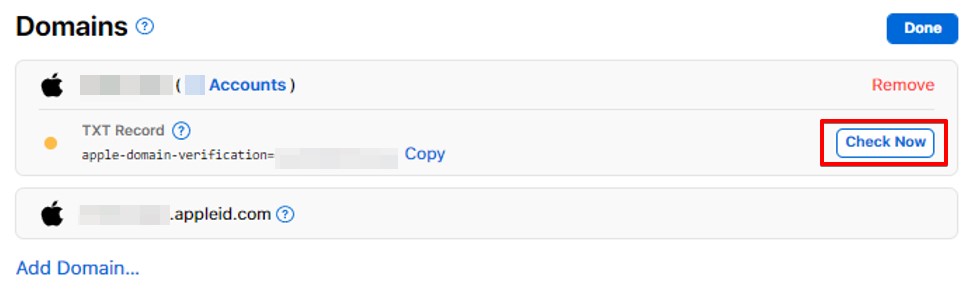
 - In Apple Business Manager , sign back in with an account that has the role of Administrator or People Manager.
- Click Settings at the bottom of the sidebar, then click Accounts below Organization Settings.
- Locate the domain whose TXT record was added, then click Check Now.
- If the TXT record has been correctly entered into the DNS zone file, the shown record and Copy button should change to Verified ownership.

- You will receive an email from Apple as well with the same confirmation.

- After a domain has been successfully verified, you can remove the TXT record from the zone file.
Frequently Asked Question
Q: What if you have two or more UEM solutions (i.e. Jamf, MobileIron, etc.) that have the same @domain.com configured prior to March 2020?
A: Per Apple support:
- “You will want to verify it on the org associated with AirWatch, and then separately for the org that is associated with Jamf.”
- “With the new requirements for domain verification, any previous exceptions no longer apply, so this does need to be done for each org independently or after the deadline, new accounts will not be able to be created with that domain.”
