
When we first implemented VMware AirWatch, the entire process for device activation, apps installation and profiles deployment took about 30 minutes per device. With hundreds of devices to set up and a skeleton team of service desk, it would have taken weeks if not months to complete (unless of course, this wouldn’t be the case if you have Ground Control). Thanks to Apple Device Enrollment Program (DEP), we were able to streamline the process down to about 5 minutes per device. In addition, enrolling devices with Apple DEP gives us additional capabilities managing advanced functions with these corporate owned (also known as supervised) devices.
In this blog post, I will share my experience setting up Apple DEP and some of the advanced capabilities you can now take advantage of.
Prerequisites
The link below will give you a quick overview of DEP and what’s required to start.
What is the Device Enrollment Program (DEP)?
In particular, you will want to make sure the below is in place.
“When integrating with the Apple DEP portal, ensure the network is set up to communicate with mdmenrollment.apple.com on port 443, as for some On-Premise clients.”
There are two ways to enroll your devices into Apple DEP:
- Through 3rd party re-seller (Verizon, AT&T, Apple)
- Through Apple Configurator
For this particular post, we will focus on option 1. As you will see shortly, there are many benefits to supervising your devices with Apple DEP. So let’s get started.
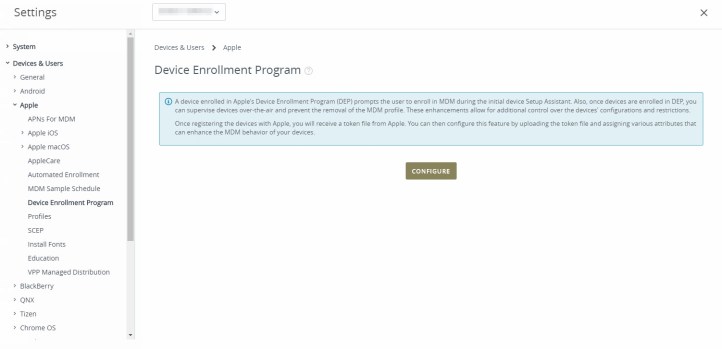
Step 1: Enable Device Enrollment Program within the web console
Within the web console, go to GROUPS & SETTINGS -> All Settings -> Devices & Users -> Apple -> Device Enrollment Program. Click CONFIGURE.
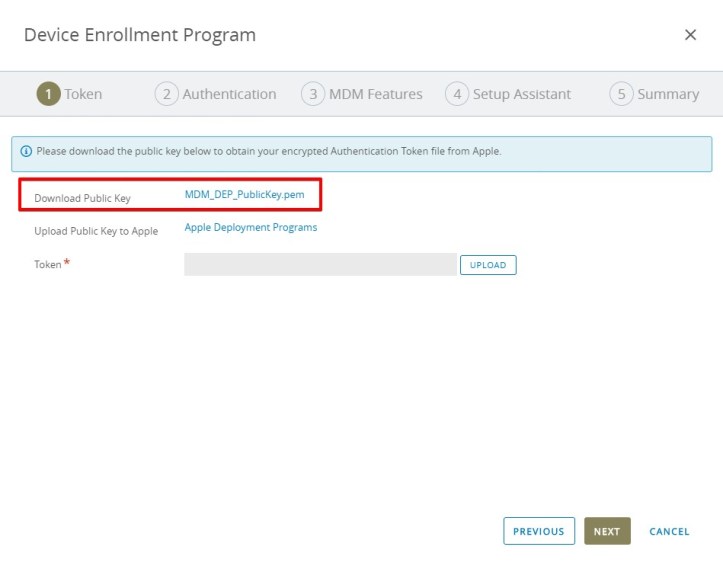
Download the public key and log onto Apple Device Deployment Programs (either at deploy.apple.com or business.apple.com).
Using Apple Business Manager for this post, click MDM Servers under Devices. Then Add New MDM Server near the upper right-hand corner.
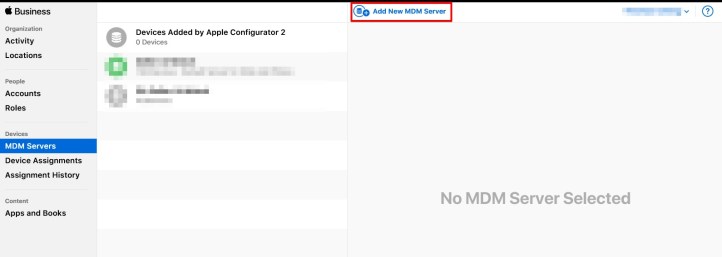
Fill in the MDM server information. Then upload the file previously downloaded from the VMware Workspace ONE web console and click Save.

Click Get Token and download it.


Return to the VMware Workspace ONE web console and upload the token. Then click NEXT.

Configure the options as you see in the remaining screens.
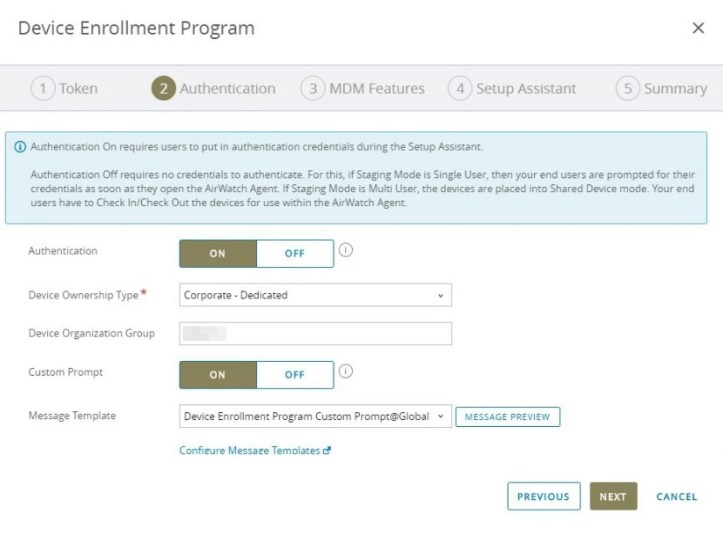
Some advantages of participating in DEP is to ensure the device:
- must enroll with an MDM profile
- must be supervised (which gives admins additional controls)
- cannot have management profile removed

Another advantage is to streamline the enrollment process with the options below.


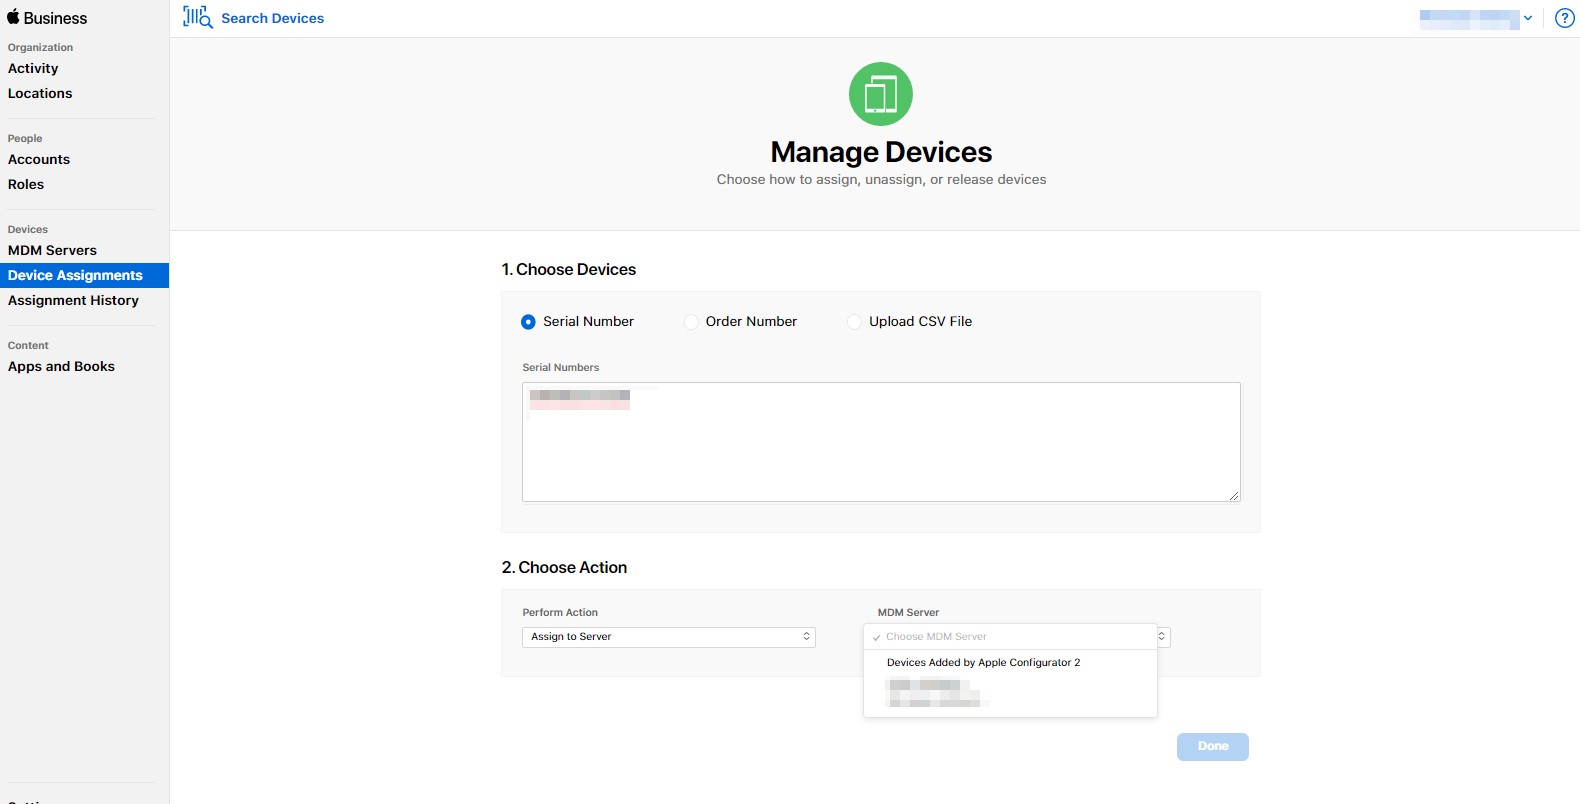
Step 2: Assign device(s) to an MDM server in Apple Device Enrollment Program
You can always assign one or more devices to an MDM server by serial number. If the devices were purchased from Apple or third-party wireless carriers directly, you may also assign by either order number or upload a CSV file with the list of serial number(s).

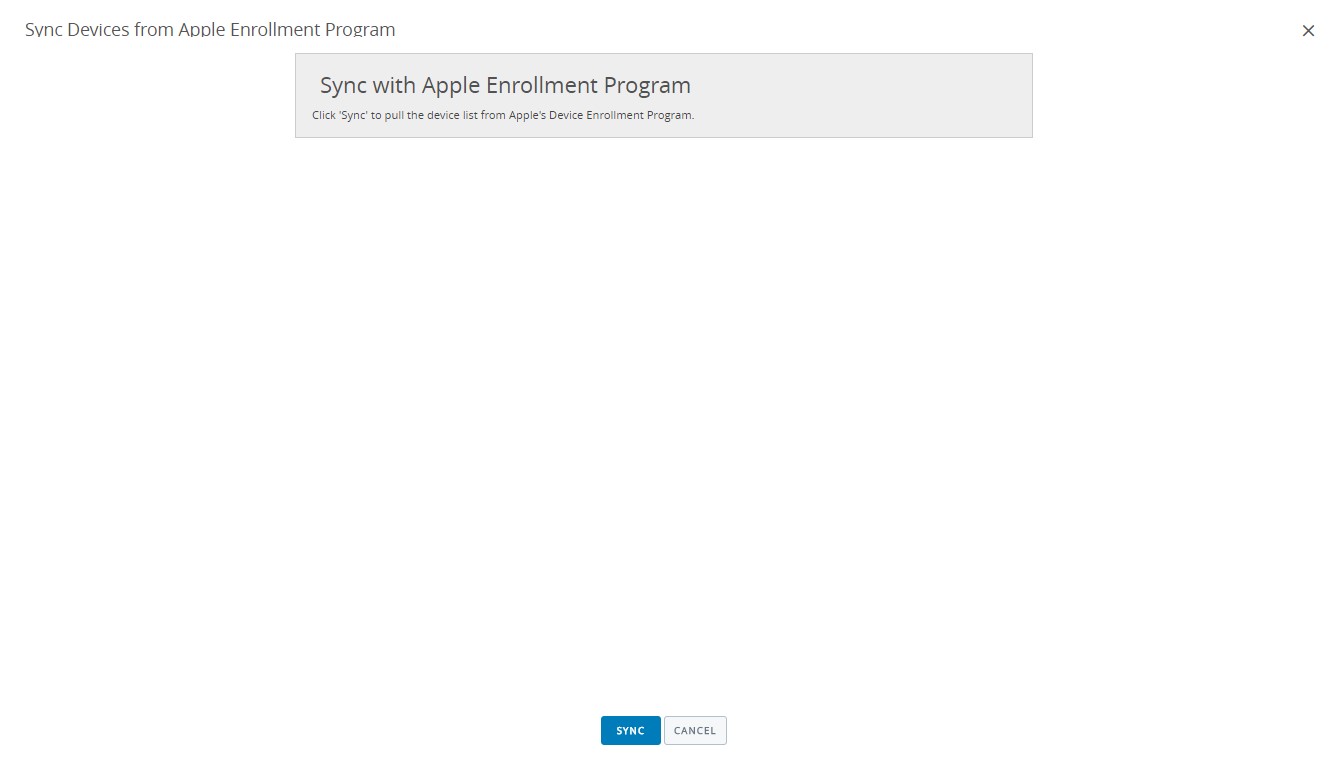
Step 3: Sync device(s) to VMware Workspace ONE web console
In the Workspace ONE console, go to DEVICES -> Lifecycle -> Enrollment Status. Click ADD on top. Then click Sync Devices.
* This will attempt to sync the newly added devices in DEP which are not present under the Enrollment Status page.

Notice under Enrollment Status, this device is now Registered (not Enrolled). Make sure this step is completed before continuing further.

If you have more than one DEP profiles configured, you may also assign a specific DEP profile to the device(s) before completing the device setup.

If the steps above doesn’t sync down the device, go to GROUPS & SETTINGS -> All Settings -> Devices & Users -> Apple -> Device Enrollment Program. Then, click SYNC DEVICES under Token section. This will attempt to sync all the devices from DEP which are assigned to the MDM Server under DEP portal. Check out this link for further details on this.
* This setting should only be used during the initial setup of DEP whenever possible.
Follow this link for further troubleshooting steps.

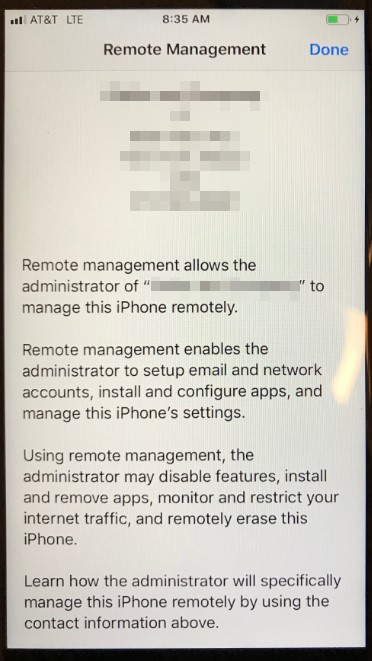
Step 4: Set up the device
From here on, proceed with the remaining steps on the device as usual. At some point, Apple will recognize this as a DEP device and will then prompt you to the profile install screen below.
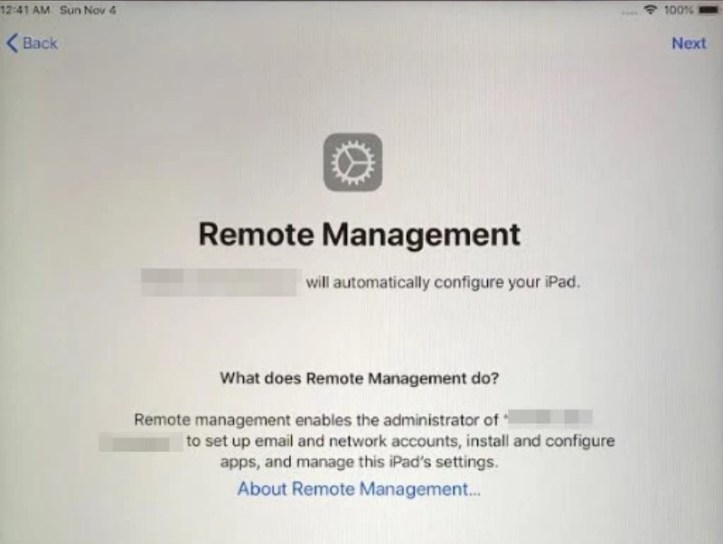
Clicking on About Remote Management gives you additional details about this step.
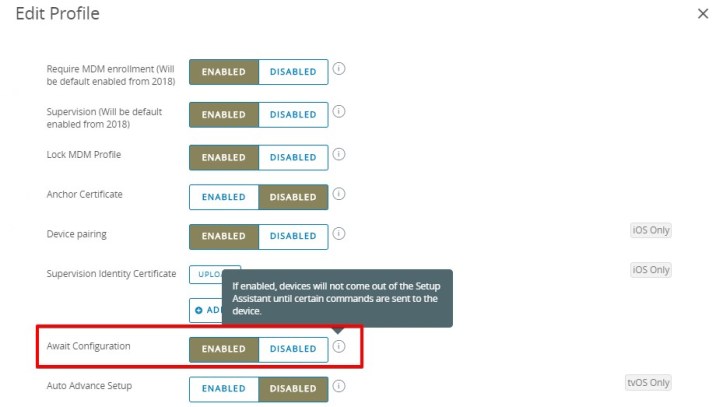
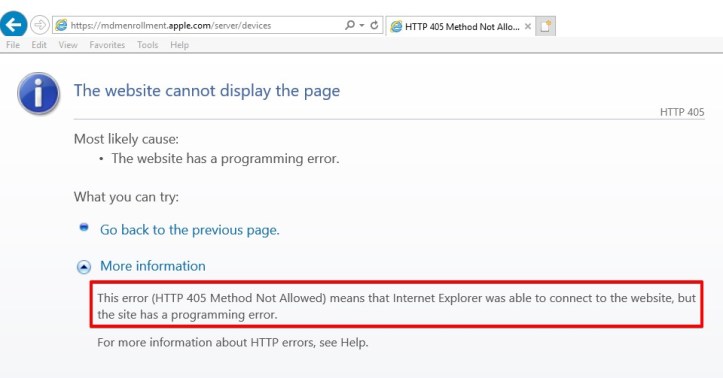
If you come across the error below after clicking Next at the screen above, disable Await Configuration within the DEP profile found inside the web console.

Once the initial enrollment completes, you can confirm its status within the Workspace ONE console changes from Registered to Enrolled under Enrollment Status.

Troubleshooting
While writing this post, I came across an issue where there was no communication between VMware Workspace ONE console and Apple for DEP.

I then worked with technical support and was guided to review the below for network requirement.
Mobile Device Management Protocol Reference
Ultimately, from a web browser go to this link and confirm that you see the message below which is expected. Device services server requires communication to the Apple site above over port 443.
In Chrome, Firefox and Internet Explorer Edge

In Internet Explorer 11
In my case, an additional firewall rule was needed to allow communication from my Workspace ONE environment to communicate with Apple DEP portal properly over port 443. Once this rule was in place, communication was restored.
One last note for this post. If you have two different MDM vendors (i.e. Jamf, MobileIron), moving orders/devices that are procured via resellers are possible. You just need to connect with the applicable reseller and have them pull and re-post the order to the desired DEP ID. The only groundwork you need to complete is making sure the reseller ID already added to the DEP account you’ll be transitioning the order to.
As always, stay mobile!

[…] This set up was based on SEG classic with Kerberos Constrained Delegation (KCD) in an Exchange 2013 environment with two or more CAS. The steps should be more or less the same for Exchange 2016 environment as well. Keep in mind, however, support for SEG classic will end in May 2019. Customers are encouraged to upgrade to V2 soon, and you can read my post on the upgrade process here. […]
LikeLike
[…] additional security measures and controls, my shared device will be supervised through Apple DEP. This means I […]
LikeLike
[…] the past, acquiring supervised devices through Apple Deployment Program (DEP) requires going through a rigorous application process with Apple and purchasing devices directly […]
LikeLike
[…] There are many other certificates that require an update on a regular basis. For more information, check out the link below or check out my post here. […]
LikeLike