
Years ago, I implemented Blackberry Enterprise Server 5.0 (known to many as BES 5) for a small to medium size business. The setup was relatively straightforward, and device provisioning was a breeze. At the time, Blackberry (previously known as Research In Motion, or RIM) was the dominant player in the MDM market. Nowadays, the shift from the handset business to focus on enterprise security that major corporations and government agencies heavily depend on keeps Blackberry among some of the major contenders in the Unified Endpoint Management (UEM) market space. My experience with the Blackberry Unified Endpoint Manager (UEM) setup is a testament to the core value of this company.
This topic warrants a number of posts so you can follow along with ease. While this series is not a one size fits all solution, my goal is to help get your environment setup and running as swift and painless as possible. Having said that, here’s the general breakdown:
- Part 1: Introduction and Prerequisites (you are here!)
- Part 2: Installation (single node and multiple nodes)
- Part 3: Configuration
- Part 4: Setup for Multi-Subnet support
- Part 5: Troubleshooting
- Part 6: Maintenance and Upgrade
Based on the size of your user population, you can start with just a standalone Blackberry UEM host. However, I recommend setting up at least one additional host (preferably in a different location) for high availability or maybe even for disaster recovery. As you will see later in this post, adding additional Blackberry UEM host for HA/DR purpose does not even require any load balancer.
Below is a diagram showing the setup in its simplest form.

If you are interested in additional security or feature enhancement to supplement your UEM setup, you will definitely want to incorporate additional components in your setup similar to the diagram below. I will share my experience on two of these components (Blackberry Router and Blackberry Enterprise Mobility Server) in separate posts.

Before we begin, it’s prudent to review the documentation from Blackberry via this link such as hardware, software and port requirements. You can also download the software from the same link.

Before the actual installation, the following prerequisites should have been completed:
- Build server(s) per requirement (pay attention to both CPU and memory).
- Download and save the installers to the server(s).
- Create a service account and assign proper permission to it on both UEM and SQL servers.
- UEM sever:
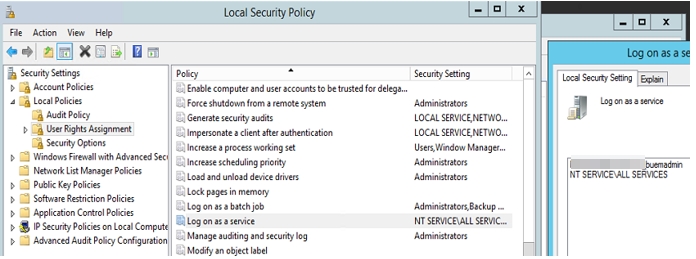
- Must be part of the Administrators group.
- Must have Log on as a service permission (i.e. Local Group Policy)
- SQL server:
- Must have db_creator privilege for database creation. This can be removed once installation completes.
- Must have db_owner privilege on Blackberry databases (this is automatically added/assigned during installation).
- UEM sever:
In some organizations, you may think of granting db_creator privilege to a different account instead of the service account for security purpose. As you will see in part 2 of this series, however, this is prohibited since you will not be able to specify the service account during installation for running all the Blackberry services on the UEM server.
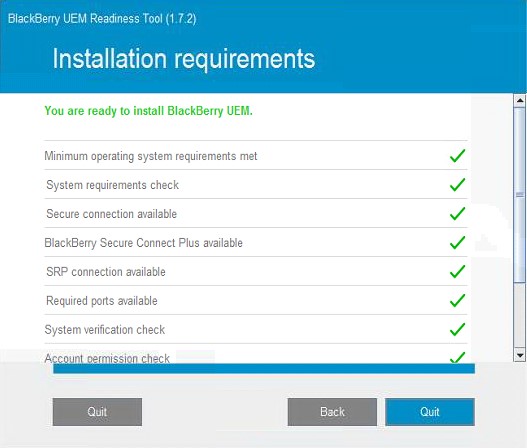
Optionally, you may run the Blackberry UEM Readiness Tool (download via this link) to make sure your server(s) is ready for installation.


I have a Blackberry Router setup in my environment, but again it’s optional depending on your security requirement.


If you have granted the service account proper privileges in your SQL environment, you can validate the database connection as well.


That’s it! Follow my journey by clicking here as we continue with the installation.

[…] prerequisites and installation, it’s time to proceed with configuration. Or you can return to part 1 or part 2 of this series which describes the prerequisites and installation in […]
LikeLike
[…] part 1 of this series, we reviewed briefly what Blackberry UEM is. We also completed a list of […]
LikeLike
[…] Part 1: Introduction and Prerequisites […]
LikeLike
[…] Part 1: Introduction and Prerequisites […]
LikeLike
[…] to my other series of posts on Blackberry UEM implementation, these series focus on Blackberry Push Notifications. Once it’s setup, however, it can be […]
LikeLike
[…] Part 1: Installation […]
LikeLike
[…] Blackberry UEM after it is implemented (you can check out my series on implementation by clicking here), you may notice that the device profile is Not […]
LikeLike
[…] Blackberry Work managed by Blackberry UEM, navigate to Apps -> Apps. Then click on Blackberry […]
LikeLike